User Opinions
|
||||||||||
|
|
|
| Wed Apr 2, 2008 - 9:11 AM EDT - By Neal Martin | |
|
|
|
|
|||||||||||
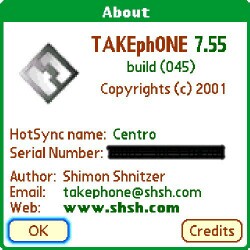
I just recently purchased my Centro through AT&T and was adding my contacts to my new device and was a bit frustrated with the 'Phone' program that was installed on my Centro. I read about TAKEphONE while navigating TreoCentral, and read a bit about it in the discussion forums.
I liked what I read about TAKEphONE, downloaded the trial version from TreoCentral, installed the program and then registered the program - all within a span of about 1.5 hours; I like the program that much! After reading the .pdf that comes with the program and familiarizing myself with the menus and sub-menus, I contacted the author of TAKEphONE to let him know how much I already liked his program. He suggested I test and review the latest BETA version of the program; hence, I'm reviewing the BETA version 7.55 (045), which I believe is slated to be an offically released version in the near future.
On with the show!
To set up TAKEphONE, you can simply go to TreoCentral and choose Free Trial to download the free trial to your desktop or click the Install Now option and choose to download to your PDA/Smartphone by SMS or download by Email to your mobile email address. Choosing to review the Beta 7.55 (045) version, I visited the authors web site and downloaded the Beta version there.
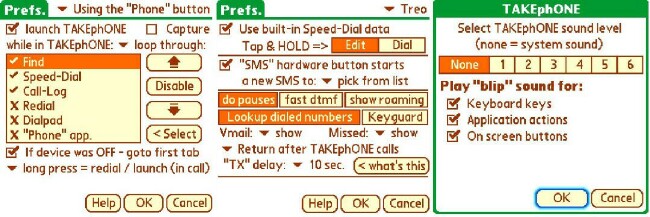
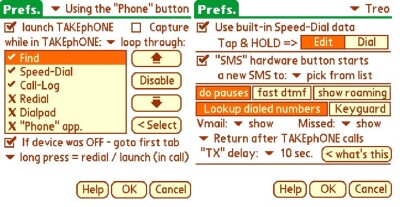
I've only used TAKEphONE for a short period, but I've already replaced my Centro's default phone application with TAKEphONE as I mentioned eariler! Before I begin my in depth review, let me pass along a most useful tip on setting TAKEphONE as your default phone application. You'll be glad you did! Once TAKEphONE is launched, tap the top left, choose Options, then Preferences and scroll (if necessary) to the page from which you can check the box which says launch TAKEphONE under the Using the "Phone" button. From then on, when you hit the Phone button, the awesome TAKEphONE is launched rather than the default phone application that shipped with your mobile device - SWEET!
TAKEphONE has five main tabs, which are: Redial, Call-Log, Find, Speed-Dial and Dial-Pad.
From the Redial menu, you are presented with a list of the 10 most recent calls you have made, with both the contacts name and the number that was dialed. Clicking on a given call redials the number for you.
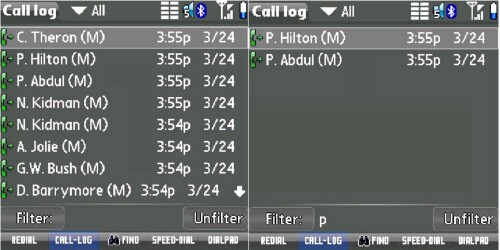
CALL-LOG allows you to view logs of incoming calls, dialed calls and missed calls. The incoming calls are indicated by a blue phone headset, the dialed calls are in green and the missed calls are in red. The time the call was dialed, received or missed is also shown. A feature here I really appreciate is the Filter option, which can be used to allow you to view ONLY the calls that pertain to that name or number. You can just as easily unfilter your criteria with the Unfilter button.
You can click on an incoming call and get details such as the the persons name (if in your contact list), their phone number, date and time of call as well as the duration of the call. By clicking on 'More actions', you are given the options of copying all details, saving to Journal, View contact history or Internet search. By selecting Internet search, you are presented with the option to initially search the contacts name on Google or WhitePages. Should you select the 'More' button, you can choose Google: news, maps, images, Dictionary, YouTube or 9 other search options, very complete. In the CALL-LOG screen, there are also options for SMS, Add and Find, all of which are pretty self-explanitory. You can also choose Sched to schedule events such as lunches, meetings, etc. and also have your mobile device alert you of the said event with an audible alarm.
You can click FIND, which is the binoculars symbol at the bottom of the screen, and find a contact by typing, either part of or all of, either their name or their phone number - very handy. You can also toggle between the two views on FIND, which are 'buttons' and 'list' by simply hitting the Alt key on your device keypad. The list view shows more detailed information about a contact, such as their status and a corresponding image if you've set one; the contact could be busy and you'd be aware and could avoid interrupting them. The buttons view doesn't show the contacts status, but does offer the big buttons of the dial pad, which I like, as I can simply use my finger or my stylus to dial the person easily. Once you've found the contact you searched for, you can click the name and the 'Details' page is presented. Here, you see the contact's name at the top of screen, and you can dial their Work, Home and Mobile numbers (if you've added them), or send them an Email using the Email program you define under preferences. Of course, you can scroll down to see/edit other pertinent information such as Pager, AIM, MSN, etc. by clicking the up/down arrows on the bottom right of the screen with your stylus.
After using Find and locating the contact you were searching for, you can also utilize the i-Bar.
From the developers website:
Speed-Dial is another of the five tabs on the main page. Here, you can define and call as many as 70 entries, which is completely sufficient for me hehe. As the name indicates, you can dial a contact by entering the corresponding number you assigned to him/her. If you're lazy or just like the ease of hitting one or two buttons to dial a call, then speed dial is for you!
You can click the DIALPAD at the bottom right of the screen and bring up an on-screen dial pad, which can be handy on devices such as my Centro, which have a full keyboard but the keys are on the small side. The dial pad is large enough that you can use your finger to dial should you not want to use your stylus, something I appreciate very much!
A handy ability of TAKEphONE is its ability to work with a Bluetooth capable device and talk 'hands free'. Once configured under 'Options' then 'Telephony Preferences' by clicking the top left of your screen, TAKEphONE works well with Bluetooth technology.
While I'm on touching on configuring TAKEphONE, let's go through the MANY available preferences and options:
By again clicking the top left of your screen, you can choose Options, then Preferences or Telephony Preferences (they seem to do the same thing) and set your location to either Mobile, Work, Car, Home or other and also allow a location swap before you dial a number. You can also choose between North American dialing or to translate based on country or area code. You can choose to use a calling-card, which TAKEphONE even helps you create by clicking on the configure button to the right of this option. You can choose to dial using a Smartphone, via Serial/BT or IrDA. Scrolling down, you can choose to use built-in Speed-Dial data, or have the "SMS" hardware button start a new SMS to a particular contact you select from drop-down list here.
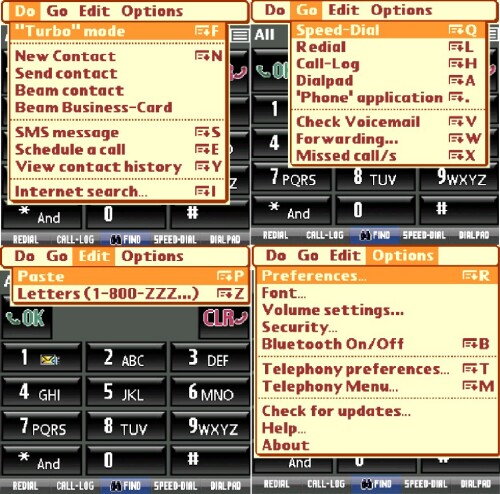
From the Options menu, you can also choose your Font preferences, such as the type of font you wish to use for text in list and status lines, the text in buttons and the text in contact 'Details'. You can select Volume settings and choose from 7 levels of volume - ranging from None (system sound) to 6. You can also choose to play the "blip" sound for keyboard keys, application actions and on screen buttons; you will become very familiar with this sound if you enable the "blip" hehe. You can choose to show records, mask records or hide records for a particular contact from the Options menu by selecting the Security option. You can also toggle Bluetooth on or off, and read built-in Help and display information 'About' TAKEphONE from the Options menu.
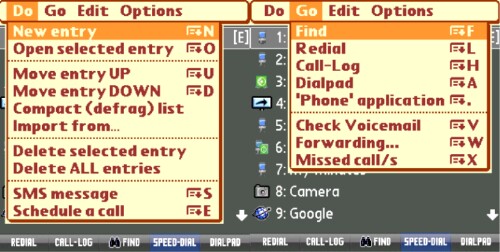
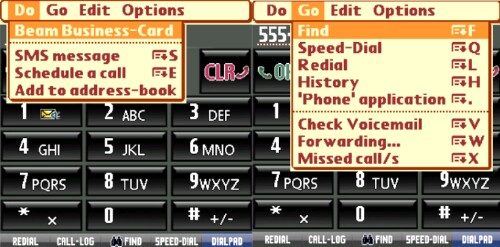
Choosing the Do menu when you have a contact selected (tapping the top left and selecting Do) allows you to switch between normal and "Turbo" modes. You can also choose New Contact, Send contact, Beam contact, Beam Business-Card, SMS message, Schedule a call, Save to Journal, View contact history or do an Internet search which are all in relation to the selected contact.
Should you choose the Go menu by clicking the top left and selecting Go, you can access the Find, Speed-Dial, Dialpad and 'Phone' application. Here, you can also check your voicemail, view/configure forwarding and view your missed calls.
A feature of TAKEphONE which may aid some of you who have many contacts and wish for 'turbo' fast searches through contacts is the "Turbo" mode. To make use of the turbo mode, you must first set up your contact list in either the "Last Name, First Name" or "Company Name, Last Name" modes and use the built-in address book sorting list function. Once configured, the turbo search mode is said to be MUCH faster than the default/normal search mode - a nice feature if you have a lot of contacts I would suppose.
I happened across the Turbo mode by chance and was confused when I was doing a test search for my wife's name and hitting the "B" key kept displaying the "#" key instead. This was due to the fact that none of my contacts last names begins with a "B" -grin-. When I realized this, I changed to the normal search mode and found my wife's name with no trouble. You can see which mode you are in on the main screen by looking at the "All" in the upper left. If it displays just the word 'All' then you're in normal mode. If it shows a yellow, lower-case 't', then you're in turbo mode.
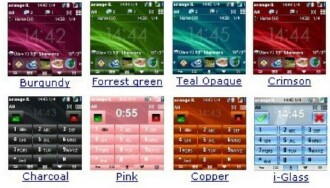
Another feature of TAKEphONE I like is the ability to 'skin' it, meaning change the color scheme of the program itself. The default colors are pleasing to the eye, but I like the ability to personalize my applications! From the authors page, ShSh Software, you can click on TAKEphONE and then click the skins link and download 6 skins with which you can personalize your TAKEphONE. I like the ALP skin and the Ronen red skin (my current skin) the best. The skins were designed by Marc Centreville and you can visit his website here. Below are some examples of the skins available
As I was preparing my review, I contacted the author of TAKEphONE, Shimon Shnitzer, and he felt some of the strongest points of the FIND function of TAKEphONE were:
I would like to thank Shimon for helping me to point out these important features, and point out that I immediately added an image of my wife to the i-Bar - on which I can click and dial my wife - very nice function!
What can I say? Just that after using TAKEphONE for the short period of time I have, I already feel this program should actually be included WITH Palm OS devices. It is, to me, a much better program than the default 'Phone' program that ships with the Centro I just purchased. The many added features and the features that are simply an improvement over the Centro's phone application make this program worthy of incorporating into the Palm OS in my opinion. I salute you, Shimon.

ShSh Software's slogan is "Telephony, Communications & Smarts all in one box". I like that. And I like what I've seen so far in TAKEphONE, the first app of theirs that I've tried. I look forward to trying out their other programs soon.
I highly recommend ShSh Software's TAKEphONE to everyone who reads this review. The cost of the program is $19.95 and it is worth every penny of that price. Updates are free to registered users, something 'some' programs just don't offer. Pick up TAKEphONE today and experience your phone as it was meant to be experienced.
(NOTE: as I was finishing up this review, Shimon had already posted yet another great official release. It�s good to see an author who works vigilantly to improve an already great program!)
Note2: There has been yet another update: TAKEphONE 7.55 (055) update in beta.
|
|
||||||||||||||||||||
|
Copyright 1999-2016 TreoCentral. All rights reserved :
Terms of Use : Privacy Policy
TREO and TreoCentral are trademarks or registered trademarks of palm, Inc. in the United States and other countries;
the TreoCentral mark and domain name are used under license from palm, Inc.
The views expressed on this website are solely those of the proprietor, or
contributors to the site, and do not necessarily reflect the views of palm, Inc.
Read Merciful by Casey Adolfsson