
So far in this on-going Palm Centro tutorial series weve explored the basics, and a lot of it, but we havent delved into the custom settings with which you can individualize your smartphone and make it your own. If youre just joining us, heres what weve covered so far.
- We introduced the Centro in Part 1,
- Shopped for Centros, a screen protector, and other stuff in Part 2,
- Dealt with dialing in Part 3,
- Took up the hot issue of HotSync in Part 4, and
- Explored the Centros native music app and how to install and play music in Part 5.
Beginning with Part 4, the new AT&T Centro complicates things, since it differs slightly from the Sprint version. I dont have an AT&T model, but Ill try to point out any differences that I know about as we go. Meanwhile, my screenshots might not exactly match your screens. For example the AT&T Centro Applications screen, which well take up frequently, has an extra icon, Push to Talk.
Tutorial time. Pull up a comfy chair, grab your Centro, and bring up that Applications screen.
The Centro settings
The Centros most important settings have dedicated hardware like the ringer/vibrate switch on the top edge of the device and the volume buttons on the left side. Your other druthers come under the domain of the Prefs application. Lets have a closer look.
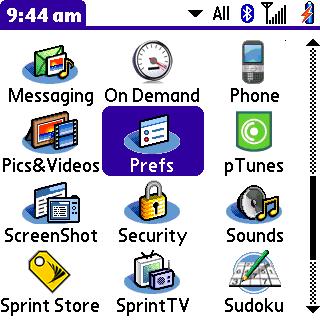
Apps is the home screen for your Centro. Everything software starts there. To bring it up, press the big flat button that has a house icon on it.
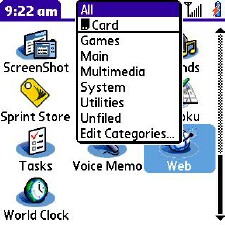
Apps screen gleaming? Make sure the dropdown menu selector says All. If it doesnt, tap it and make it so. Look for the icon named Prefs. On my Sprint Centro its on the second page use that little scroll bar on the right side of the screen or repeatedly press the Down button on the 5-Way Navigator. You can also simply push p to jump to the ps, as we discussed earlier in this series, and then use the Down and Right buttons on the 5-way Navigator to move the highlight.
Clarifying, the dropdown selector lets you display different subsets of the available apps icons. This shortcut only works if the app youre looking for is in the active menu selection, which in this case is All.
Tap Prefs. You could instead highlight it, using the 5-way Navigator buttons, and press the Center button, or the Return key. In fact, you dont have to whip out the stylus. A fingertip will usually do the trick. I find the stylus easiest on the resulting screen, however, but in all of these tutorials, when I say tap, do the highlight-and-Center-button thing instead if youd rather.
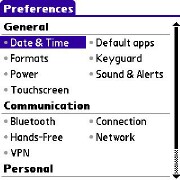
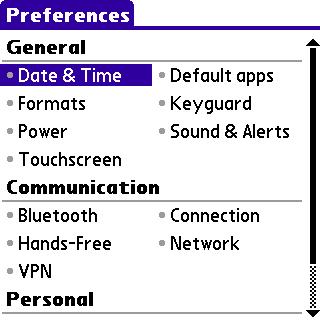
The Preferences screen shows three categories of items you can change: General, Communication, and Personal. Well start with the General category, escorting each entry to the Explanatorium in turn.
General Preferences
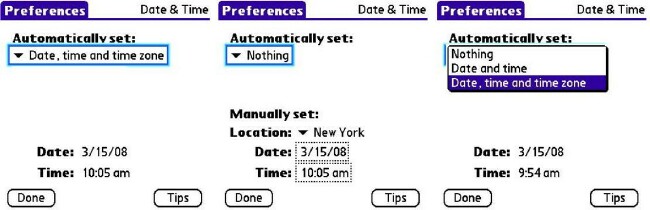
- Date & Time. If your Centro doesnt know the correct time, it might be because this Preferences item is other than: Automatically set > Date, Time and Time Zone. This option tells the Centro to query available cell towers and calculate local time wherever you are. This is useful, for example, when Daylight Savings Time kicks in, as it just did at this writing, or when Daylight Wasting Time, as it ought to be called, returns in the fall. If you use the Centros calendar and scheduler, and travel among the time zones, this setting can help keep your appointments somewhat sane.
The time and date show at the bottom of the screen well work on their format next. If youre using the automatic settings and the time or date is wrong, wait 30 or so seconds for the cell tower to be polled. If it doesnt change within about a minute, turn your phone off (hold down the red Power/End key) and back on (hold Power/End again) to re-initialize the Centros clock from the cell tower (You do have plentiful bars?). For a quick discussion of time zones and the like, tap Tips. When done, tap the Done button.
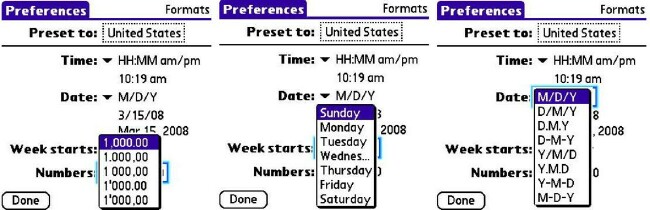
- Formats. Perhaps you frowned at time and date being displayed wrong for your taste 24-hour instead of 12, for example. This Preferences option lets you set that the way you want it, as well as the order of day, month, and year, plus your preferred punctuation for dates, times, and numbers. Tap your choices, and tap Done.
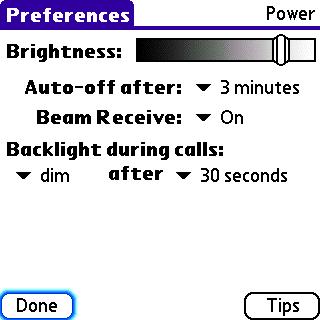
- Power. Screen brightness and some other things greatly affect how much battery life youll get. Heres where you can set those items up to conserve (or squander). My favorite of these is Auto-off after
This tells the Centro how long to wait for your input before turning its screen off. The default is 30 seconds. I hate that, so I bump it up a notch or two, so I wont have to keep waking the thing up from its incessant naps.
Screen brightness
Screen brightness does what youd expect, but Prefs isnt the only place you can change it. You get the same control directly from the keyboard without opening Prefs. Press the Option key (leftmost in the second row from bottom), and then press p it has a Sun on it to remind you. Use the stylus or the 5-way Navigators Left and Right buttons to adjust the slider.
Either way, the screen brightness setting is global. You can temporarily dim the screen and turn keyboard backlighting off by pressing the Option key and then the Menu key. A screen tap or any key press restores the brightness to your Preferences setting. Watch out for that any key, though. The Power/End key disconnects any ongoing calls. Oops.
The key to menus
Menu key? What Menu key? Glad you asked. Youll need this key often, so take a sec and go exploring at the bottom right of the keyboard. It has an icon that looks like a pulldown menu being pulled down. Anytime youre puzzling at a program, try pushing the Menu key to see if it has any pulldown menus. The menus are usually also available by tapping the top edge of the screen with the stylus, but the Menu key is a surefire way to make them appear.
On the Power screen, Beam receive controls whether the Centro accepts (and constantly polls for) signals sent by Infrared (IR) from other devices such as other cell phones. This polling is a power eater, so leave it off if you dont need it. If youre trying to beam something to the Centro and its not responding, this setting might be the problem.
If operating time between re-charges is a problem, consider changing to a higher-capacity battery. The third-party marketplace for these is still developing, but Palm offers an extended battery claimed to offer 80 percent more power. It comes with a white replacement back cover that matches the AT&T phone, but unfortunately adds a hump to the Centros sleek shape. Well explore other power products and options for reducing unnecessary battery drain later in this series.
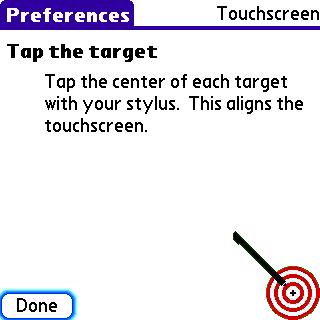
- Touchscreen. This Preferences item takes you through the standard setup for the Centros touchscreen. Use the stylus to tap the exact center point of each of the targets. If youre getting unpredictable results from tapping the screen, this is where you re-calibrate.
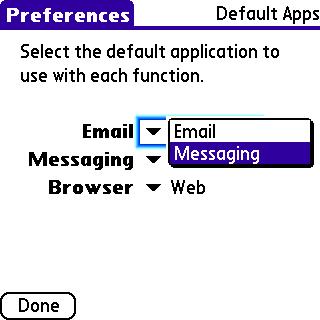
- Default Apps. A big feature for the Centro, and a valuable one, is its ability to run thousands of programs that add features and capabilities. The native applications can be replaced or augmented with other software. This Preferences item is where you set up which programs the hardware buttons load for each of: Email, Messaging, and Browser. I recommend leaving these at their defaults until you have a reason to change them. And something to change them to.
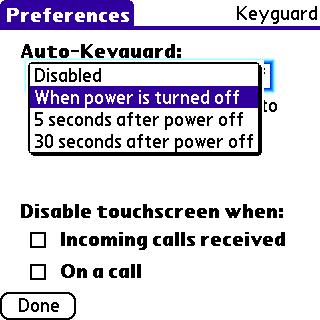
- Keyguard. This item controls how the Centro decides when and whether to lock the keyboard against accidental (or otherwise) input. For example, If you carry your Centro in your pockets - well, you know. Do your own thing, by all means, but I like the default. It locks the keyboard anytime the display is off, leaving the Power/End key recognized so you can un-blank the screen, and it enables the touchscreen and the green Call/Send/Answer button when a call comes in.
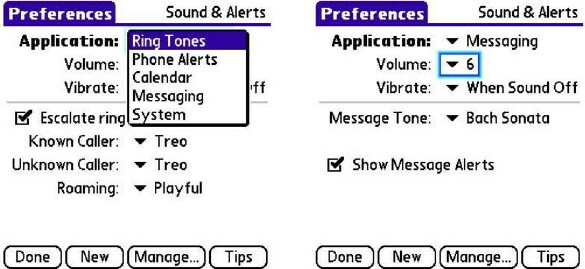
- Sound & Alerts. The Sound & Alerts item controls what sounds the Centro makes when calls come in, and when something else happens in the smartphone that requires your attention. The biggie of these is the ringtone. Remember, you can individualize ringtones in the Contacts app. This Prefs app lets you choose a general default for what sound to play a ringtone when the caller is unknown, and the same or another one for when the caller is known, but doesnt have a specific ringtone established.
To change the default known-caller ringtone, pick Ring Tones in the list beside Application. Choose a volume in my noisy downtown world anything less than 6 or 7 is too low and set the vibrate option to your liking. Click whether you want the ringtones volume to ramp up (about 5 seconds to maximum), and tap the menu next to Known Caller:. The lo-o-o-ng list that appears isnt even all thats available. Those tiny arrows will page the menu for more choices.
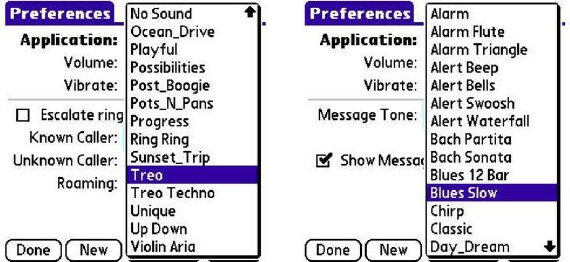
When you select a ringtone, the Centro plays it for you. When youre happy with it, move to the next option, Unknown Caller: and choose in the same way.
I hear you asking, How do I put my own custom ringtone on the Centro? Thats a big subject for later in this series, so Ill promise a thorough treatment in the future.
Going back for a minute to the Sound & Alerts screen, notice that you can also customize the sounds your Centro plays:
- When a calendar event for which youve allowed an alarm comes up. The options include both an alarm and a reminder. The rest of it is fairly obvious, but tap Tips for guidance.
- When a new message arrives (Messaging in the Sound & Alerts menu).
- When system sounds occur. The control for this one is volume. On the Centro a setting of 7 is quite loud. Tap Tips for more information.
After you set up any of these preferences, the Centro remembers the settings, even after its turned off. You can always come back and change the behaviors again.
Conclusion
Weve covered a third of the Preferences app, the General category. You dont need to know or use any of this to enjoy your new Centro. However, you can delve into the Preferences / General menu options to make it your own. Next time, next topic. Unhand that remote!
